- July 30, 2024
- iBirds Software Services
- 0
Step 1: Create an Auth. Provider
Log in to your Salesforce org. Navigate to “Setup” by clicking the gear icon in the upper-right corner. In the Quick Find box, type “Auth. Providers“. Click on “Auth. Providers” and then click the “New” button.
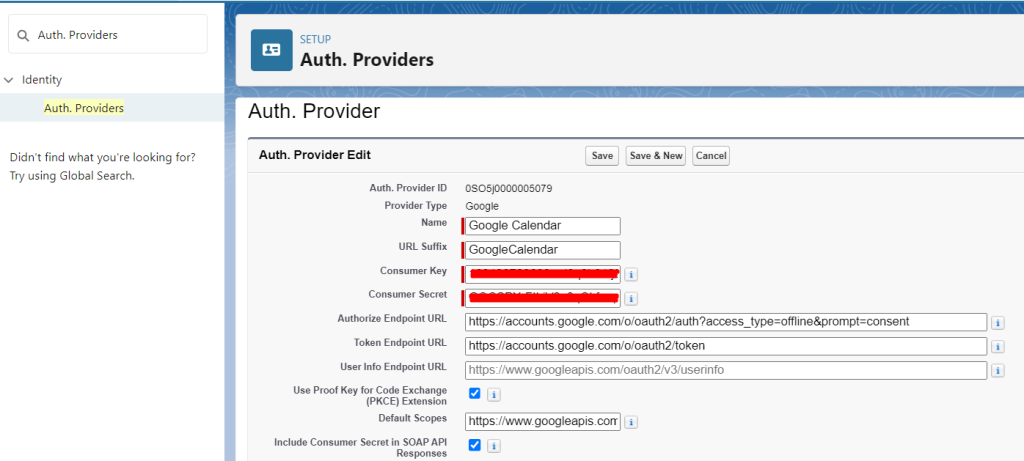
Configure the Auth. Provider as follows:
- Provider Type: Google.
- Name: Choose a name for the Auth. Provider. (Google Calendar)
- URL Suffix: Enter a unique value, such as “GoogleCalendar”
- Consumer Key: Obtain this from your Google Cloud project (similar to what you did for Postman).
- Consumer Secret: Obtain this from your Google Cloud project.
- Authorize Endpoint URL: “https://accounts.google.com/o/oauth2/auth” OR “https://accounts.google.com/o/oauth2/auth?access_type=offline&prompt=co nsent“
- Token Endpoint URL: “https://accounts.google.com/o/oauth2/token“
- Default Scopes: Add the necessary scopes for the Google Calendar API, such as “https://www.googleapis.com/auth/calendar.readonly” for read-only access.
Click the “Save” button. (Save the Auth. Provider.) as you can see in the image below.
Note: Use the callback URL you specified when creating OAuth credentials. (add to Client ID for Web application -> Authorized redirect URIs)
Step 2: Create a Named Credential
In Salesforce Setup, type “Named Credentials” in the Quick Find box. Click on “Named Credentials” and then click the “New Legacy” button. (drop-down)
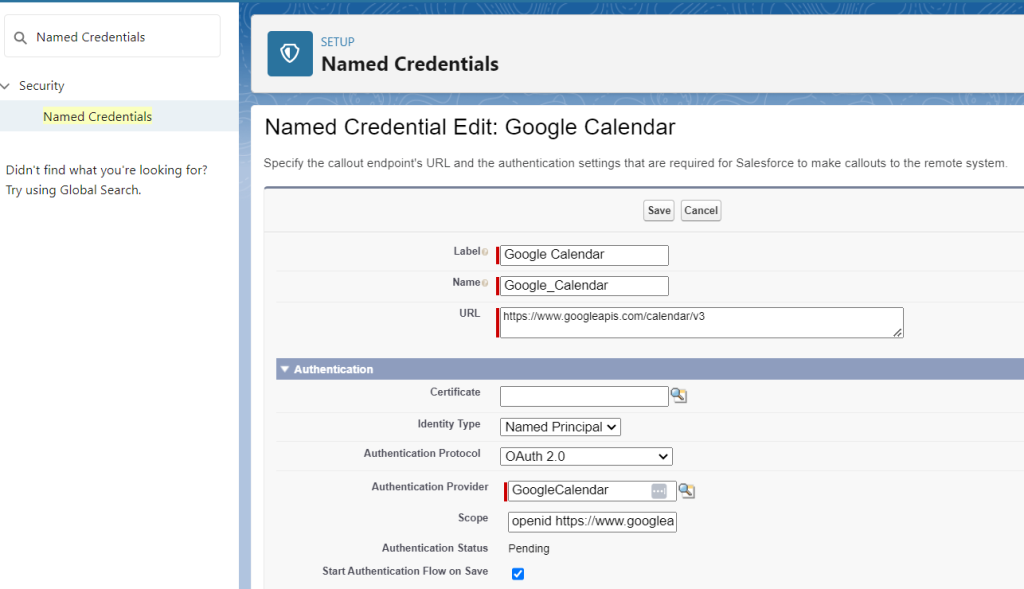
Configure the Named Credential as follows:
- Label: Enter a label for the Named Credential.
- Name: This will be automatically generated based on the label.
- URL: This is the base URL for the Google Calendar API,( e.g. “https://www.googleapis.com/calendar/v3“)
- Identity Type: “Named Principal”
- Authentication Protocol: “OAuth 2.0”
- Authentication Provider: Select the Auth. Provider you created in
- Step 1. (Like Google Calendar)
- Scope: Enter the necessary scopes, such as
“https://www.googleapis.com/auth/calendar.readonly” OR
“openid https://www.googleapis.com/auth/calendar.readonly”
Save the Named Credential. as you can see in the image below. as you can see in the image below.
Step 3: Create an Apex Class to Make API Calls
public class GoogleCalendarService {
public static String getCalendarData() {
HttpRequest req = new HttpRequest();
req.setEndpoint(‘callout:Your_Named_Credential_Name’);
//request.setEndpoint(‘callout:GoogleCalendar/calendars/primary/events’); req.setMethod(‘GET’);
req.setHeader(‘Accept’, ‘application/json’);
Http http = new Http();
HttpResponse res = http.send(req);
if (res.getStatusCode() == 200) {
return res.getBody();
}
return null;
}
}
Step 4: Use the Apex Class in Your Salesforce Code
“Open Execute Anonymous Window” and run the class
String calendarData = GoogleCalendarService.getCalendarData();
Auth. Providers

Named Credentials

